pyRouterJig A woodworking layout tool for creating box and dovetail joints
Editor
The Editor tab allows you to edit each individual cut of the joint. The editor operates on the A-cuts of the Top Board; all of the other cuts (B, C, D, etc.) follow from the A-cuts. The starting joint for editing is whatever was last specified under either the Equal or Variable spacing options. Under the Editor, the board and bit dimensions, along with the Double and Double-Double parameters, cannot be changed; make sure these are set to their final values under either Equal or Variable before switching to the Editor.
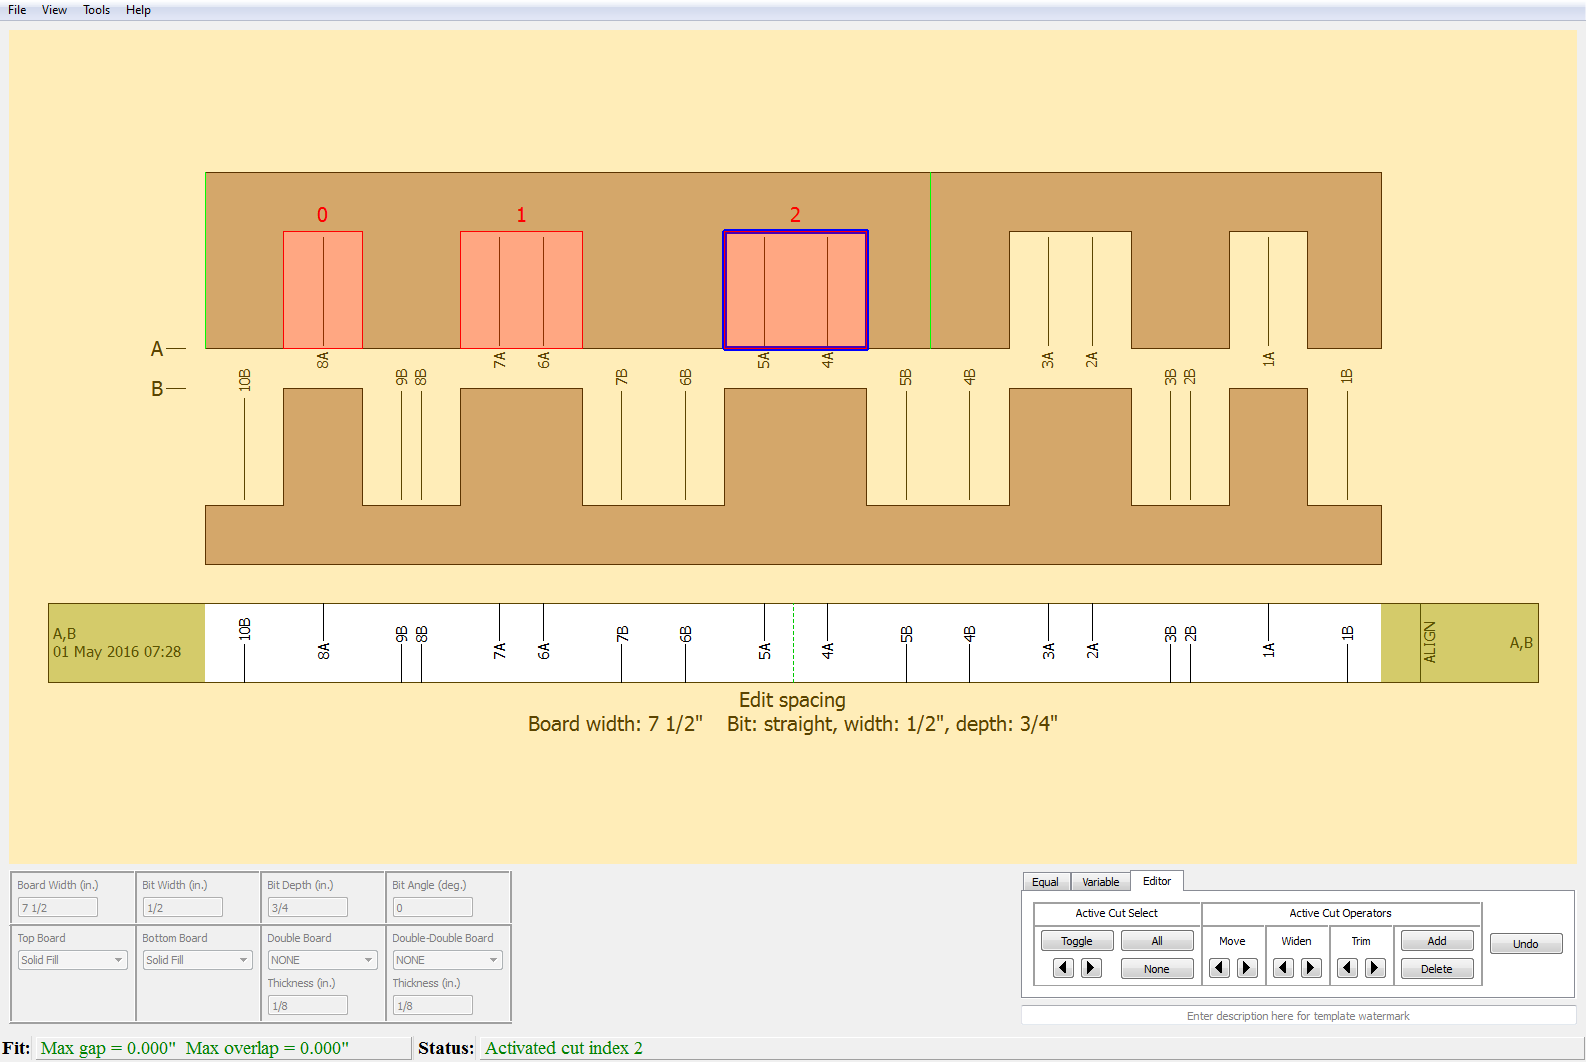
Figure 8 shows an example of entering the Editor, after setting up the joint as in Fig. 7 of the previous section. An active cut is highlighted in red and is the cut which is to be edited, using either the buttons under the Editor tab, or using keyboard shortcuts. Again, active cuts are always on the A-cuts of the Top Board. The blue outline on a cut indicates the cut cursor. The cursor is used to select active cuts. More than one cut may be active. The green vertical lines indicate the extents that the active cuts can be moved or widened, limited by the bit width.
The Editor functionality is grouped into two main categories, with buttons (or
corresponding keyboard shortcuts) controlling the actions taken.
The buttons and shortcuts are as follows:
- Active Cut Select: This category allows you to select which
cuts are active. Active cuts are those for which the Active Cut
Operators will be applied, described below.
The buttons for this category are as follows:
- The arrow buttons (keyboard: left or right arrows) control the position of the cut cursor, shown with a blue outline.
- Toggle: (keyboard:
Return) Toggle the cut at the cursor as active and deactive. When active, the cut is highlighted in red. - All: (keyboard:
a) All cuts are set as active. - None: (keyboard:
n) All cuts are set as inactive.
- Active Cut Operators: This category applies editing operators to
the active cuts, and its buttons are as follows:
- Move: (keyboard: Hold
Altkey, along with left and right arrow keys) The arrows move the active cuts 1 increment to the left or right, if possible. - Widen: (keyboard: Hold
Alt+Controlkey, along with left and right arrow keys) Widens the active cuts on their left or right side by 1 increment, if possible. - Trim: (keyboard: Hold
Controlkey, along with left or right arrows) Trims the active cuts on their left or right side by 1 increment, if possible. - Moves the cut cursor to the right or left cut to the right or left to be the active cut.
- Add: (keyboard:
+) Adds one cut, if possible. There needs to be space enough to add a cut, given the board width and bit constraints. The cut is added in the first possible location found, searching from the left side of the board. - Delete: (keyboard:
-) Deletes the active cut.
- Move: (keyboard: Hold
Finally, the Undo button (keyboard: u) reverses the last editing
operation. Undo may be applied repeatedly, until the joint is back to the
starting point of invoking the Editor.
As each operation is performed, the status is reported at the bottom of the screen in the Status bar. The status will be red if the operation failed. A failure isn’t serious; it usually means that the operation can’t be performed because it would result in a joint that cannot be cut with the current bit.
Note that if you make changes in the Editor, and then go back to either Equal or Variable options, the changes will be lost.